A Ten-Minute Object Study for a Quiet Afternoon
A ten-minute object study turns one familiar object into fresh drawing material by revealing how its outline and visible details change as you look.
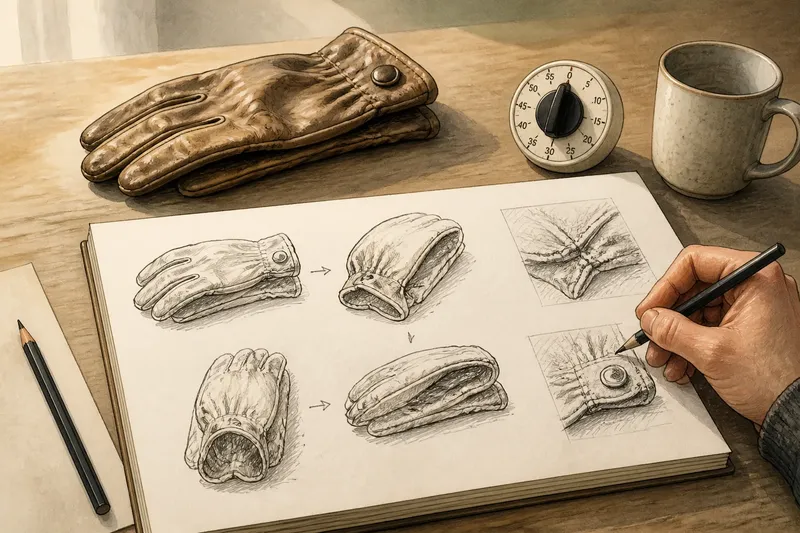
How can you begin drawing when no subject comes to mind? A ten-minute object study gives you a simple starting point: choose one familiar object and draw the shapes and details you can actually see. A mug, key, apple or folded glove will do.
What belongs in a ten-minute object study?
Choose an object that is easy to see and turn, such as a ceramic mug, a key or a folded glove. Familiarity helps: you can focus on its visible form rather than trying to identify it.
Place it on a table in comfortable light, with paper and a pencil or pen nearby. Sit where you can see the object without holding it awkwardly. This is an observation exercise, not a test of drawing skill.
Use only two sources of change: shape and detail. Shape includes the outer contour and the way parts overlap; detail includes visible marks, seams, joins and surface changes. Leave out imagined settings and stories so each drawing stays grounded in what is in front of you.
How can you make several distinct views?
Set a quiet timer for ten minutes. Use the time as a guide: draw one view, turn the object or change your viewpoint, then draw what has become different. You do not need to fill the page or follow a fixed sequence.
- Check whether the outline has changed after a small turn; if it has, draw the new contour, but if it has not, turn the object farther or choose another viewpoint.
- Check whether one part now overlaps another; if so, mark the new relationship, but if not, look from above or below before drawing again.
- Check whether a previously hidden feature is visible; if it is, draw that detail, but if it is not, leave it out and shift your view.
- Check whether the object’s parts appear differently balanced; if they do, draw the whole object, but if they do not, make a close study of a visible feature.
- Check whether a surface mark or seam is clear from your seat; if it is, record its position, but if it is not, move to a more comfortable viewing angle rather than guessing.
- Check whether the latest sketch differs from the previous one; if it does, leave both on the page, but if it does not, change the viewing angle before starting another.
These decisions keep each drawing tied to a visible change. If one angle offers more to notice, stay with it instead of rushing through every possible view.
Which changes in shape and detail should you look for?
Begin with the silhouette: the outer boundary between the object and its background. Notice whether the object looks wider, narrower, taller or more tilted from a new viewpoint. A mug’s handle, for instance, may overlap the body from one angle and appear as a clearer loop from another.
Then compare the relationships between parts. A rim can look oval from above and flatter from the side; a fold may conceal a seam until the object turns. Draw details only when they are visible, leaving uncertain or hidden areas blank.
Should you draw the whole object or a close detail?
Draw the whole object when its overall contour or the arrangement of its parts has changed. Choose a close detail when a small feature becomes newly visible and has a clear form. Switching between these views makes the page easier to compare than a row of similar outlines.
Say you have a folded glove, a sheet of paper, a pencil and a table with steady light. First, draw the glove’s broad outline from the front. Turn it until the tucked thumb and a seam become visible, then draw the changed whole shape and the seam close up; finally, compare the page and note which angle revealed the seam. The result is a set of drawings tied to visible changes, though the close view gives less information about the glove’s overall form.
What can you change when the views seem alike?
How do I get a different outline?
Turn the object farther or look from a more noticeable height, while staying in a comfortable position. If the contour still looks much the same, switch to a clearly visible detail rather than drawing another near-identical outline.
What if a detail is hard to see?
Adjust the object or your seat until the feature is visible in the available light. If it remains unclear, leave it blank; guessing would make the drawing record an imagined detail rather than an observed one.
Should I erase a drawing that looks inaccurate?
Usually, leave it and start a fresh drawing beside it from the current view. Comparing the two can show which edge or overlap changed, while erasing removes that record of what you saw earlier.
What can you learn from the finished page?
Look across the drawings and identify one visible change, such as a handle that narrowed or a fold that hid a seam. Add a short note beside the relevant sketch if it helps you remember which angle revealed it; describe what you saw rather than judging the drawing.
For another ten-minute object study, choose a different familiar object and keep the same focus on shape and detail. The useful starting point is not novelty: it is noticing which parts change, appear or disappear as your view changes.